So you’ve decided to cultivate your own cannabis for the first time? It’s a great decision! You’ll know everything about the bud you’re consuming, how it was grown and what products if any were used on it. Flower obtained from unreliable sources can be tainted with many impurities. Those that sell it on are just after the money, they don’t care about your health and the chemicals they use on the plants.
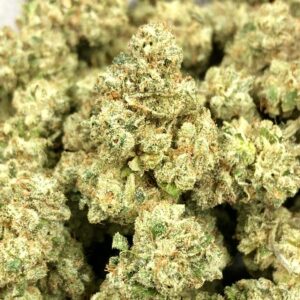
Yes, growing top shelf weed takes a bit of work, but anybody can cultivate good quality cannabis for the first time at home with a bit of dedication and love. Your realistic goal when cultivating for the first time should be to actually harvest something you’ll enjoy smoking. Expecting to harvest kilograms of the highest quality bud on your first go is not easily obtainable. Rather be humble, learn as much as you can about the plant and how to cultivate it. Once you have a harvest under your belt, it’s only up from there so keep it easy and just aim to finish your first run.
For your first time, a good quality potting soil designed for cannabis in a container no smaller than 20 liters is a good start. With potting soils you unfortunately get what you pay for, so if you go cheap you’ll get cheap. The better quality soil will give you better quality bud and they are all reusable. Suitable products include 420 Mix – 30L, Atami Bi Grow Mix – 50L and Organic Potting Mix – 30L. Alternatively plant in the ground in the sunniest spot in the garden top dressed with some quality compost or Worm Castings. A sprinkle of Bone Meal and mulch will help too.
The Cannabis Life Cycle
Cannabis is an annual plant. This means it usually grows from seed in the spring and dies going into winter. A cannabis plants’ life cycle can be broken up into 3 stages:
- Seedling Stage
- Vegetative Stage
- Flowering Stage
The Seedling Stage
The name says it all. Seeds will develop a pair of first leaves followed by it’s first pair of “true” leaves. No fertilizer is needed at this stage. Make sure the soil is moist but not water logged. Once the newly sprouted plant has developed it’s first 2-3 sets of true leaves (5-7 blades) it’s moving into the vegetative stage.
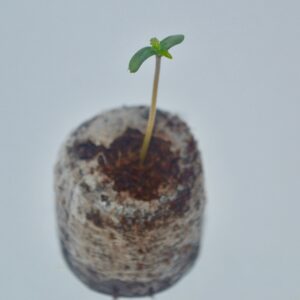
Most who cultivate cannabis for the first time find that the seedling grows too long and falls over. This is due to not getting enough light so make sure it receives direct sunlight without wilting.
More on germinating cannabis here. Additives like BioBizz Root Juice and Rrhiz-Up Mycorrhizal Fungi is perfect to get young plants strong and healthy.
The Cannabis Vegetative Stage
This is when the plant will grow vigorously adding new side branches and fan leaves. It’s aim is to grow as big and bushy as possible. The stems will thicken to prepare for the weight they will carry while the cannabis plant grows into that christmas tree shape. Train plants in this stage by gently bending and tying down branches. Plants can also be topped by cutting off the upper growing points. Topping promotes lateral growth and more bud sites, increasing yield. Items that can be useful to train cannabis include Bamboo Stakes 120cm – Pack of 25, Plant Bends – Pack of 50, Lighthouse Twist Tie – 50m roll and the LightHouse Garden Soft Tie.
All this will take place in the height of summer but as the days shorten, the plant will mature sexually and get ready for the flowering stage. They will be consuming quite a bit of food and yellowing leaves could appear towards the bottom of the plant. If this happens, simply top dress with some compost or worm castings and water well.
Fertilisers like Bat Guano Organic Fertilizer, Biobizz Bio Grow and BioBizz Fish Mix can aid in lush green growth. Apply additives like BioBizz Bio Heaven, Crop Candy Amino Acids, BioBizz Acti Vera and Sea-Rock Liquid Kelp to increase nutrient uptake and overall health of the plant.
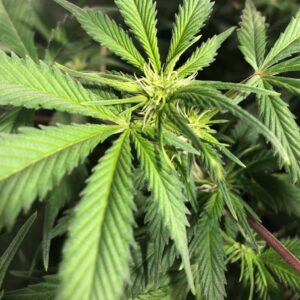
It’s during the veg stage that plants may start to express their gender. Female plants grow a calyx (flower part) at the base of a node or bud site. This calyx is oval shaped, often points upwards and has two white hairs (pistils) that grow out of them.
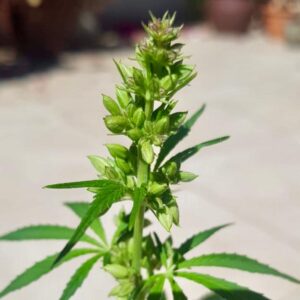
Male plants also grow an oval, rugby ball shaped calyx at the base of the node but they tend to hang and have no pistols. More of these will suddenly start showing up like a bunch of grapes which is a clear indication of a male plant. Males are undesirable and will seed a female plant resulting in inferior cannabis. Identify any males, or plants that posses both male and female flowers, and discard as early as possible.
The Cannabis Flowering Stage
Cannabis plants are photosensitive meaning they ‘keep track’ of the length of the day. Flowering is triggered when sexually mature plants receive 12 hours or less direct light. The first indication that the plant is going into flower, is it’s “stretch.” Stems suddenly show explosive growth pushing bud sites upwards in order to catch pollen from the wind. The stretch will slow down after the first two weeks of flowering and some strains will stretch more than others.
The next indication that flowering has begun is the presence of pistols at the growing points. More and more the plant will add pistols and by the 3rd week of the flowering stage, the buds will start to look like pin cushions. Smaller sugar leaves will grow out of buds in order to produce food for them. By this time the plant will also start producing trichomes, the tiny mushroom like glands that manufacture cannabinoids like THC and CBD. They look like sugar crystals on the bud sites and the more of these the plant produce, the better.
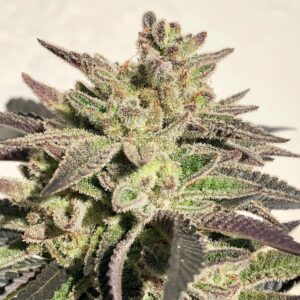
If late in the flowering stage the plant starts showing yellowing leaves towards the bottom, refrain from top dressing with compost or worm castings. This is a normal part of the process as cannabis moves nutrients around in it’s body preparing to die. If this happens within the first 4 weeks of flowering, top dress as above in the vegetative stage.
Apply additives like Atami BloomBastic, BioBizz Top Max or BioBizz Bio Bloom to increase flower size and density. Support cannabis flowers using the PLANT!T YoYo.
When Is My Cannabis Ready To Harvest?
This is the big question among those who cultivate cannabis for the first time. Flowering length can be anything from 7-14 weeks depending on the strain. You’ll know buds are ready to harvest when 70-80% of the pistols have turned brown, red or orange in colour. They will also shrivel and curl, retracting back slightly into the calyx. If you have the means to get a magnifying jewelers loupe, you can check the trichomes for maximum potency.
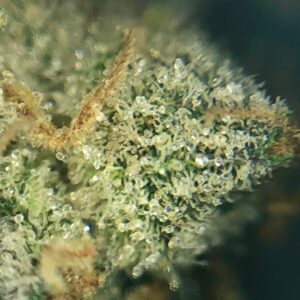
Trichomes start out clear turning a milky or cloudy white and then finally an amber colour. It’s during the ‘cloudy white’ stage that THC levels are at their peak. When they become amber THC is staring to degrade into other cannabinoids. If harvested when cloudy, smoked cannabis will give you an uplifting ‘head’ high. If harvested when trichomes are amber, the resulting effects are a relaxing ‘body’ high. A good ratio that many growers look for is 80% cloudy with 20% amber trichomes. This will give you an all round high that most cultivators go for both commercially and at home.
Precision Pruner – Titanium Coated(Opens in a new browser tab)
Harvesting Cannabis For First Time Cultivators
When you’ve decided that now is the time to harvest your cannabis, it’s best to cut down the whole plant at the base and hung upside down to dry. The quicker a plant dries the harsher the taste can be. Another issue many faced by those who cultivate cannabis for the first time. The more biomass there is the longer the cannabis will take to dry, so hang the whole plant. Choose a space thats cool, dark and dry with a small amount of ventilation. An empty hanging cupboard with the door opened and closed 2-3 times a day is perfect. The garage can work well too as long as it doesn’t get too hot.
Make use of hanging dryers like the Lighthouse 75cm Dry Net or the Lighthouse 55cm Dry Net.
Cannabis is dry enough if the stem snaps when trying to bend it. If stems bend rather than break, your plants still have some drying to do. Buds should feel crispy to the touch and sugar leaves dried and shriveled.
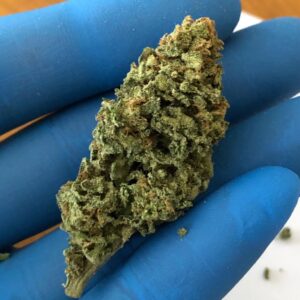
Once cannabis is dry, remove the buds carefully from the stem. With a Precision Pruner – Titanium Coated or Stainless Steel Curved Shears or Stainless Steel Mini Clipper trim off the sugar leaves carefully. They contain carbs, chlorophyll and other compounds that don’t taste great when smoked. Now it’s time to cure.
Portable Trimmer(Opens in a new browser tab
Curing Cannabis For First Time Cultivators
Curing cannabis has many advantages and in some ways curing well is just as important as cultivating it well. The aim of curing is to remove most of the remaining moisture slowly. THC in your freshly harvested and dried bud is mostly still in another form, THC-A; so curing will increase potency. Over time, the THC-A will break down into psychoactive THC. Even though buds will feel dry to the touch, they still have a lot of moisture in them.
Place your freshly trimmed cannabis into air tight containers filling them only three quarters of the way. Leave them in a cool dark place and after 24 hours open the container for 5 minutes.
By doing this, relative humidity inside the container will reach 100% quickly. This helps moisture to distribute evenly through the cannabis flowers. When opened, fresh, drier air is introduced into the container. Buds will then give out a bit of their moisture until air in the container reaches saturation again. This is curing and it should be practiced for a quality product.
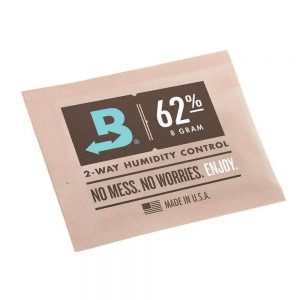
Repeat this process for 2-4 weeks opening the jar every day in the first week, every second day in week two and so on. Studies have shown that THC levels increase up until 6 weeks of curing so patience will pay off.
Your cannabis is now ready to be stored in the same container. It will keep at this stage for a long time but potency will start decreasing after 6 months. Light and heat degrade THC so keep your stash cool and in the dark for best results. Open the jar every so often to replace the stale air inside although it shouldn’t actually be necessary.
Water Droplets In The Jar
If after the first 24 hours of curing you notice wet buds or any water droplets in your container, remove the cannabis to dry for another day or two. Placing the flowers on paper towels on a dark shelf will be fine. When buds are still too moist, moulds can easily grow and your effort will be for nothing.
Roll the buds around gently too, this stops them from sticking together causing ‘wetter’ areas.
Consuming Your Cultivated Cannabis
Finally, it’s taken a few months with some time and dedication but you’re now ready to try out your bud. Obviously the effects are a good way to tell how your weed came out, but there’s a small trick to tell more about it when it burns. In a joint, cannabis that’s been cultivated well will burn and smoke well. It shouldn’t struggle to burn nor be “grassy” and harsh on the throat either. Good cannabis tastes great and won’t make you cough (unless it’s your first couple of times).
Alternatively, you can have your cannabis tested. This is a good way to get an idea of potency when making extracts like using the Magical Butter Machine. Testing the flowers will also give you an indication of how decent your bud is and how well you’ve done. For more on testing please feel free to email info@happyharvest.co.za
And there you have it, our guide to on how to cultivate cannabis for the first time. We hope this helped you and that you’re well on your way to enjoying that feeling of consuming your own home grown. Feel free to tag us on Instagram with your progress if this post helped you, here’s our page.
To further your cultivation skills and knowledge, read our guide on How To Grow Dense Cannabis!


0 Comments